Intelligent Playlist Plugin for Amarok 2
The Intelligent Playlist Plugin for Amarok 2 implements dynamic playlists based on the current playlist.
The Intelligent Playlist Plugin (IPL) for Amarok 2 tries to immitate the dynamic playlists built into Amarok itself. But instead of selecting some criteria for the tracks to be selected, you just drop some tracks into the playlist. The Plugin will then try to find similar tracks in your collection and automatically appends them to the playlist.
Download and Installation
The plugin is available via our Download Center. Just download it and in Amarok, go to Tools -> Script Manager and click the Install Script button. Select the just downloaded archive and afterwards restart Amarok. Now you can enable the plugin in the Script Manager. Alternatively, you can download the plugin directly from within Amarok’s script manager or visit kde-apps.org to get a copy from there.
Setup
The plugin installs two sets of menu entries: On in the tools and one in the settings menu. The playlist is configured and driven by them mostly.
Initial Setup
This step is recommended but not mandatory. Doing it will allow the plugin to serve your needs much better. However, it is able to function also without.
The plugin comes with an analyzation module, allowing to set some parameters initially. To use that module, to to the tools menu:

Select the Analyze Similar Tracks entry. Now, the following window should show up:
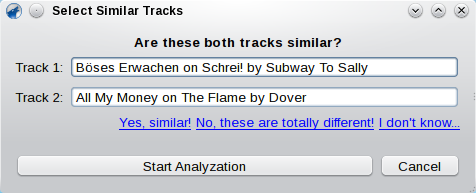
The module will select pairs of random tracks. You can use the links below the tracks to either marks them as similar or not similar or skip a pair, if you don’t know whether or not they are similar. Note that there is no actual minimum number of pairs you have to categorize. However, the more you sort, the better the result will fit your needs. So, consider to spend at last about 10 minutes or so.
To start analyzing, hit the Start Analyzation button. Note that the following procedure might take some minutes (depending on how much tracks you have sorted). You can cancel it by hitting Cancel. After finishing, you will be asked whether you want to apply the calculated values. Agree to this and close the window.
Note that you can repeat this as often as you want. However, by applying the results, you discard your current settings! So it is generally a good idea to make this step once after installation.
Setting up the Plugin
The main configuration of the plugin can be show using the settings menu:
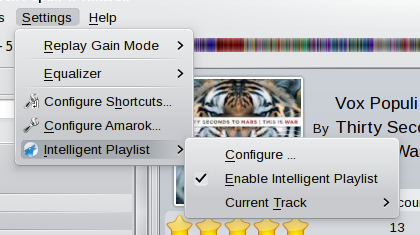
There, select Configure…. Now, the configuration dialog will be shown.
The configuration is grouped in several pages. The most important page is the first one:
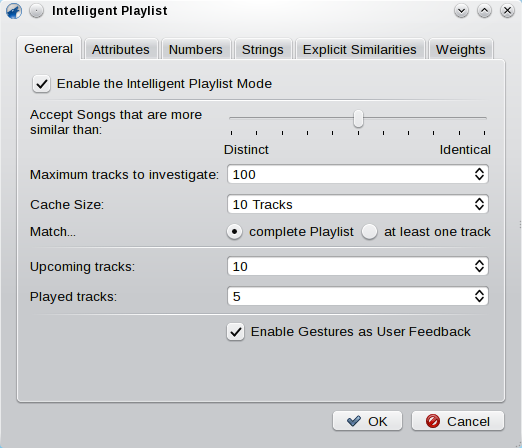
By checking the Enable the Intelligent Playlist mode you can enable the plugin. There is also a short cut for this option in the settings menu, so you don’t really have to open the dialog each time you want to turn the plugin on or off. The next set of options determines the general behavior of the plugin: It functions by regularly checking the playlist. If it needs to fill it, it will select maximum tracks number of random tracks from your local collection and compare them to the current playlist. If one track reaches the minimum similarity it will be appended to the playlist. You can choose to compare each random track to either the complete playlist or just single tracks: The former will usually result in better playlists but also is a bit slower. The Cache Size can remain as it is set by default. You can increase it a bit if the plugin generates sometimes bad playlists for you, however, usually doubling the initial value should be sufficient. There is no reason to set this to a huge number currently. If you have enough RAM and a fast CPU, you can do so, but it will not increase quality in the same dimension.
The next group determines the layout of the playlist. The played tracks are counted from the beginning of the playlist up to the current playing track. If there are more, the plugin will remove them subsequently. The upcoming tracks are the remaining tracks - the ones that are still to be played. So if adding these two numbers together, you will get the number of total tracks in the playlist. Of course, one can manually drop more tracks into the list. The plugin will then just stop searching for similar ones for a while, until there is again enough space for new tracks.
The last point can be used to toggle evaluation of gestures. This is connected to the used learning mechanisms of the plugin. I will describe this later.
Now to the second page:
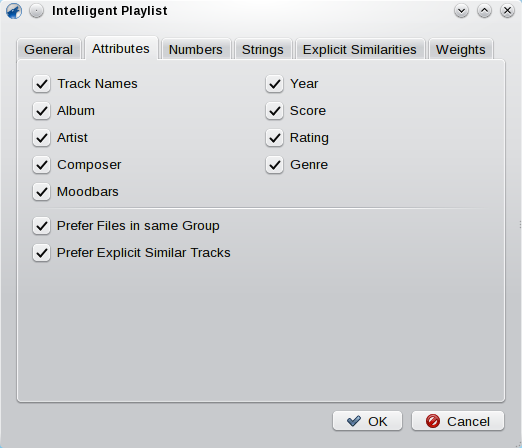
Here you can select, which information to use to calculate the similarity between tracks. Simply check the attributes you want to include. However, note that for evaluating the moodbars you must generate them on your own! See this article for information how to build them. Beneath the similarity search, you can also activate one or both of the options in the seconds group. These enable a simple implementation if alternative inference: If a track is found that is explicitly similar (see below) or that is marked with the same label as one in the playlist, it is automatically chosen and the similarity check is skipped. This usually results in more interesting playlists compared to the similarity only method.
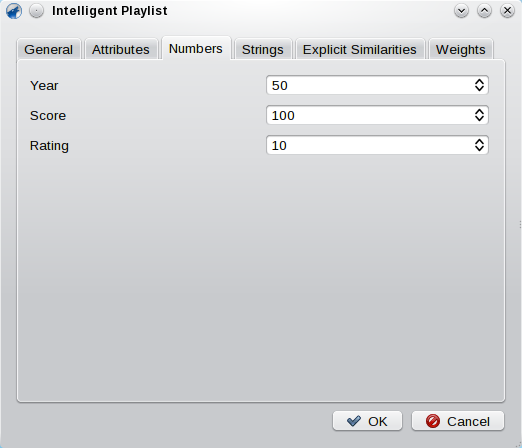
This page allows you to set up how numbers are compared. Basically, it allows you to set a maximal distance, until which two numbers are assumed to be at least a bit similar. Similarity decreases until this maximal distance and beyond it, the two are assumed to be completely different.
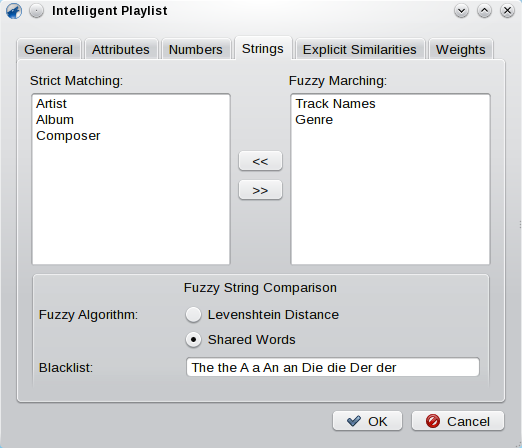
Here you can set up how string attributes are compared. Basically, you can decide between two different methods: Strict matching and fuzzy matching. Strict matching means, that the strings are only tested whether they are equal or not. Fuzzy matching tries to calculate a similarity value, which also can be somewhere between equal and unequal.
To sort your attributes: If your collection is very well tagged, let as much attributes be checked strict only, as it is faster. However, if you often have projects involving more than one artist (i.e. the artist attribute often looks like ArtistA feat. ArtistB) or if you have lots of tracks that are alternatives of the same song (ie.g. Song and Song [Orchestral Version]) then move these attributes also to the fuzzy matching list. Select Shared Words as fuzzy string comparison algorithm and maybe fill the black list (usually it is a good idea to add articles as the and a to the list).
If your collected is tagged less accurate, better move all attributes to the fuzzy list and select Levenshtein Distance as fuzzy string comparison method. This will recognize some basic relations between tracks even if their attributes are often misspelled.
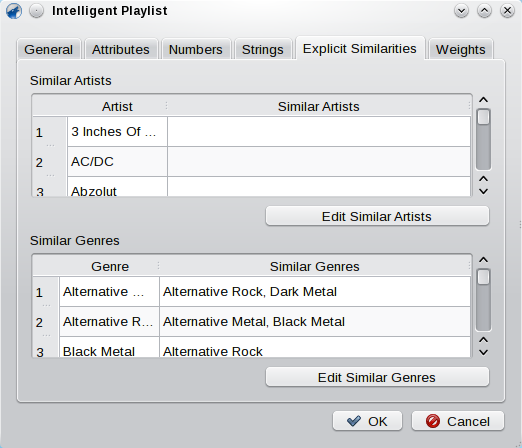
This page allows you to setup and manage explicit similar artists and genres. That means: If you find Artist A and Artist B are similar, just add them here. Select either of them in the table of artists and hit the button below the table. Now, check the other in the appearing list and submit. These similar artists and genres are used for the similarity calculation but also can be used with the alternative method described in the beginning.

This page lets you set the weights of each attribute used for similarity calculation. Usually, you should better let the Similarity Analyzer fill this or you should use the built-in learning methods to adjust them. However, nobody will stop you altering them via this page. But note that it is difficult to guess which values will really result in a good playlist.
Improving the Plugin - Feedback
The plugin supports a simple form of learning: By giving it feedback, you allow it to adjust the used parameters and therefore serve you with better playlists. To give feedback, you have to rate the selected tracks. So, if you think, a selected track is really similar, say it. On the other side, if a selected track is completely different from the other tracks in the playlist, just let the plugin know. To rate tracks, you can use the Current Track settings menu:
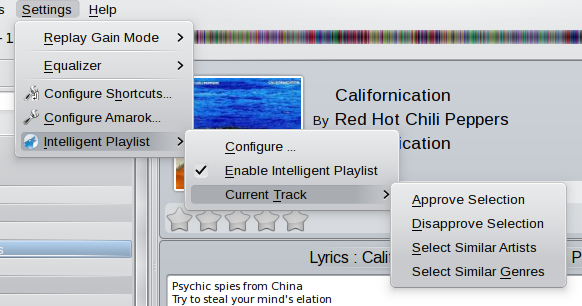
There you can either approve or disapprove the currently playing track. You can also enable gestures in the configuration. Currently, the following gestures are recognized:
- Changing the volume
The plugin also collects some statistics for the explicit similar artists and genres. You can use these data by going to the tools menu of the plugin and select Similar Artists & Tracks. There the plugin will offer some artists and genres it assumed to be similar. Use the provided links to either agree or discards the statistics for the show selection. This form of adjusting the plugins parameters can be either used “stand-alone” or together with the initial analyzation method to improve its results.
Development
The Plugin is written in QtScript. You can get the latest version from GitLab. The latest stable release can be downloaded via our Download Center or from kde-apps.org. If you encounter any problems, please report them via our bugtracker. You can also fill feature requests there. If you have further questions, feel free to contact me, e.g. via e-mail.